


The Bortle Scale
The Bortle Scale is an attempt to quantify the brightness of the night sky as a function of location. Amateur astronomers can use the Bortle Scale to get a numerical value that relates what objects can be seen on a given night with what may be hidden under the cloak of light pollution. It provides an excellent guide to the darkness of an observing site and is also useful in comparing sites among the variety of sites around the world.

It’s important to remember that the Bortle Scale is a guide only, assigning a value to a particular site is rather subjective; there are no consistent measurements or standards used to determine a site’s Bortle value, rather there are somewhat vague guidelines used to arrive at a particular value (outlined below).
The scale is most helpful to amateurs who wish to gauge what they may or may not be able to observe at a local site. The scale isn’t used in professional astronomy, which employs exhaustive measurements of various sky conditions and parameters over time to determine the quality of observing sites.
The Bortle Scale has nine levels, ranging from one to nine, with one corresponding to excellent dark skies and nine corresponding to light under extreme light polluted areas such as city centers. In each description below, there is an example of the effects on imaging and what, if any, accessories you may need to get the best views of the night sky.
Bortle Scale 1: Excellent Dark-Sky Site
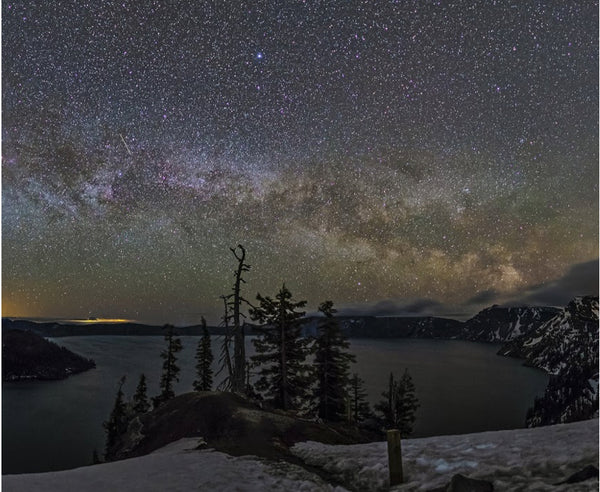
This is the site we all wish we could observe under: pristine dark skies where the stars and the Milky Way cast shadows. There is no visible light pollution anywhere—including no light from the Moon—and there are so many stars overhead that you can’t easily make out the major constellations. One can easily see the Andromeda Galaxy, the Orion Nebula and many globular clusters with your naked eye. The night sky background is pitch black.
For imaging, almost any camera/telescope combination will produce great results under Bortle 1 skies. DSLRs, monochrome CCDsand multicolor CMOS chips will all produce great photographs. The use of LRGB filters and multiple exposures will produce pristine color images of nebulae, planets and galaxies. Single, long exposures lasting minutes will produce great results. If calibration images are taken (darks, flats, etc), hours long exposures are possible.
Bortle Scale 2: Typically Truly Dark Site
Under this sky, the background sky has a slightly gray shade, not true black, perhaps from atmospheric scattering or distant airglow on the horizon. Many Messier objects are still observable by the naked eye.
Best cameras still include those from a Bortle 1 site and LRGB filters would work wonders. DSLRs, monochrome CCDs and multicolor CMOS chips all produce well under these sky conditions and using LRGB Filters with short exposure times and stacking are stunning, Galaxies, planets and nebulae show up very well and here too, single, longer exposures are possible.

Bortle Scale 3: Rural Sky
These skies still allow for the major structure of the Milky Way to be seen but the fine detail is gone. There is some light pollution from nearby communities which produce a lighter background sky which looks decidedly gray near the horizon and darker overhead.
For imaging, DSLRs, monochrome CCDs and color CMOS chips along with any filters you’d care to add are king and work amazing under this Bortle Class. The only change may be the use of an occasional light pollution filter when imaging near the horizon. Single, longer exposures are possible but probably shouldn’t try much over an hour.
Bortle Scale 4: Rural/Suburban Transition
Under these skies, the sky background has lost any black and is gray at the darkest points overhead. Light pollution is invading more of the horizon and casts a significant sky glow over head. It is still possible to see the Milky Way, but the only deep sky objects that may be visible with the naked eye will be the Orion Nebula and Andromeda galaxy (or similar).
For imaging, one-shot color DSLR cameras will work well with a light pollution filter and one can benefit from narrow-band filters with bandpasses in the 6-15 nm range. Single, long exposures under 30 minutes are still possible.
Bortle Scale 5: Suburban Sky
These are the skies most of us live under (including many rural areas these days). The Milky Way is very weak and almost invisible. The background sky is gray throughout with light pollution domes strewn a full 360 degrees around the site gradually getting darker at the zenith. There aren’t any naked-eye deep sky objects.
Under these skies one begins to get the benefit of multi- and short-exposure imaging. Using a DSLR or a monochrome CCD camera and taking multiple, short exposures to be co-added (either using software or manually later), will show striking results and overcome many of the pitfalls of the observing conditions. LRGB filters can still be employed by taking multiple exposures under each filter and then coadding them, first by filter, then together, which will produce professional results. Narrow band filters in the 6-12nm range will block out much of the sky background light as well. Calibration images (flat fields, darks, etc) become mandatory here to remove stray light in the telescope tube and sky gradients to enhance the faint signal from the bright sky.
Bortle Scale 6: Bright Suburban Sky
Light pollution under these conditions is very bright, illuminating any clouds in the sky so much that they are easily seen in the dark and are brighter than the background sky, which is a consistent gray. A portion of the Milky Way may be seen near the zenith and only the brighter stars outline the familiar constellations.
Imaging here would greatly benefit from multi-image short exposures using a cooled monochrome CCD to cut down on thermal and background sky noise (calibration images are essential again). For longer exposures, narrow-band filters will definitely improve images with emission targets(nebulae and some galaxies).
Bortle Scale 7: Suburban/Urban Transition
These skies mark the beginning of full-sky light pollution. The entire sky background is light gray and the clouds are brightly lit from below. Milky Way is no longer visible.
For imaging, filters that remove specific wavelengths, like those from sodium and mercury vapor lamps would be beneficial. Ultra narrow band filters on the order of 3nm will remove most sky background at the expense of some signal from the object being observed. Longer exposures are possible using these filters only for classes of objects that emit light at the wavelengths being employed by the filter. Some further enhancement might be found using a polarizer for those objects not suited to narrow band imaging.
Bortle Scale 8: City Sky
One can easily read a book under these skies, they are so bright. Many stars from familiar constellations are no longer visible. Only the brightest deep sky objects can be visually observed using a telescope.

Light pollution filters, LRGB filters, and all categories of narrow band imaging are useful here. The best results however will be seen in processing the calibrated images using software. Exposures lasting a few minutes could be combined over the course of a half an hour to produce pleasing results of most deep sky objects. Narrow band filters ~3nm help with nebulae, but for broader emission objects like galaxies one should employ 6-12nm bandpass filters.
Bortle Scale 9: Inner-City Sky
Most stars are gone under these conditions. One can see only the brightest stars in the sky, the Moon and planets. The sky is brilliantly lit and astrophotography becomes very difficult
Imaging under these conditions would best be done using 3nm, 6-12 nm narrow band filters, polarizers, and anything else you can get your hands on to cut down the sky background. I wouldn’t rule out a pair of sunglasses over the objective. Once the sky has been removed as much as possible, use image processing to bring out the faint, feeble signal lying underneath that bright noise.
Effects of Higher Bortle Scale Numbers for Visual Observing
Here is an image that shows the effect at different Bortle Scales to give you an idea of light pollution at these locations. As mentioned above, when imaging, it is possible to overcome the adverse effects of light pollution in your images using the various tips and techniques given above. With visual observing, it’s a little more complicated.

Visual observers will need larger apertures at higher Bortle Scales to see objects that would be clear and bright at lower Bortle Scales measurements. Smaller apertures would benefit somewhat from a “light pollution filter” which can reject many wavelengths that common city lighting emits.
Using A Visual Light Pollution Filter at Higher Bortle Scales
As with everything in amateur astronomy, there are many different types of filters for many types of observing and imaging. Read this article for a more complete overview of light pollution filters for imaging, but for visual use under higher Bortle Scales, they usually consist of a broadband interference filter that reduces the light emitted by many common city sources (streetlamps, signs, etc). A typical visual broadband filter allows 60nm at visual wavelengths through with some having filter profiles that can block out streetlights. To compare, imaging-only filters block out all light except for about 3nm at specific wavelengths desirable for galaxies and nebulae, making them only usable for long-exposure imaging. Visual filters on the other hand, by blocking out these wavelengths over a broad area, have the effect of increasing contrast because it’s blocking out some of the background light while enhancing the dim light from a galaxy or nebula.
Many light pollution filters are marketed as Ultra High Contrast (UHC) filters and are designed to be attached to an eyepiece. As with eyepieces, they come in a variety of sizes and prices but are usually much less expensive than their imaging counterparts (which are usually narrow–band and hence, quite expensive).
To be honest, these filters are only a modest improvement under visual conditions. While they do reduce some sky background and increase contrast, they also make the galaxy or nebula you’re looking at dimmer, making larger apertures even more useful.
How To Figure Out the Bortle Scale in Your Backyard
Probably the easiest, fastest way to figure out the Bortle Scale in your backyard or favorite observing spot is to go to LightPollutionMap.info and zoom into your location. Once there, click on your town or street and the popup will give you lots of information including GPS Coordinates (useful if you’re setting up your GOTO telescope for the first time or out in the middle of nowhere), sky brightness and the Bortle Scale of that location.
You can also download apps that tell you this stuff and you can even build your own background sky monitor, but sky brightness doesn’t change very much so a once-in-a-while check is sufficient. The Bortle Scale at your location evolves slowly as more development expands in your area or a new car dealership gets built down the street. So unless you move around a lot, are in unfamiliar territory, don’t have an internet signal and need to know the Bortle Scale at your current location, you don’t need to invest in a lot of equipment to get this information.